.png)
LEVEL: EASY
Materials Needed
Yarn: Size 3/lightweight yarn
Main color (silver): 300g
Accent colors (aqua & teal): 30g each for the border
Cream color (for joining): 30g
Hook: 4mm crochet hook
Other Tools: Scissors, yarn needle, stitch markers
Gauge or Tension
First 3 rows of the solid granny square = 8 cm x 8 cm (2.5” x 2.5”)
Blanket Size
Finished size: 78 cm x 91 cm (30.75” x 35.75”)
Abbreviations (US Terms)
ch = chain
dc = double crochet
hdc = half double crochet
sl st = slip stitch

Pattern Instructions
Granny Square
Make a magic ring or ch 4 and slip stitch in the first ch using your main color.
Round 1: (3 dc in the ring, ch 2) x 3, 3 dc in the ring, ch 1, hdc in the top of the first dc to join.
Round 2: 2 dc in the ch space, (dc in the next 3 stitches, 2 dc in the next ch space, ch 2, 2 dc in the same ch space) x 3, dc in the next 3 stitches, 2 dc in the next ch space, ch 1, hdc in the top of the first dc to join.
Round 3: 2 dc in the corner, (dc in the stitches from the previous row, 2 dc in the next corner, ch 2, 2 dc in the same corner) x 3, dc in the stitches from previous row, 2 dc in the next corner, ch 1, hdc in the top of the first dc to join.

Now we will crochet the little waves in the first accent color, do not cut the main color. Turn your work, and pick the new color.
Round 4: * sl st in the same corner, dc in the same corner, (sl st in the next stitch, dc in the next stitch) x 5, sl st in the next stitch, dc in the next corner **
Repeat from * to ** for each side of the granny square, sl st to join with the first st of the round.

Round 5: 2 dc in the first dc from the previous round, (dc in the next 11 sts from the previous row, 2 dc in the next st, ch 2, skip 1 st, 2 dc in the next st) x 3, dc in the next 11 sts, 2 dc in the next st , ch 1, hdc in the top of the first dc to join.

Fasten off and cut the main color. Turn your work, and pick the second accent color.
Round 6: * sl st in the same corner, dc in the same corner, (sl st in the next stitch, dc in the next stitch) x 7 , sl in the next st, dc in the next corner **
Repeat from * to ** for each side of the granny square, sl st to join with the first st of the round. Fasten off and cut the yarn.

Make the last round only if you don’t want to use the joining as you go method, attach the cream color in any sl from any corner.
Round 7: dc in the first sl st, 2 dc in the first dc from the previous round, (dc in the next 15 sts from the previous row, 2 dc in the next st, dc in the next sl st, ch 2, dc in the same sl st, 2 dc in the next st) x 3, dc in the next 15 sts, 2 dc in the next st , dc in the first sl st, ch 1, hdc in the top of the first dc to join.

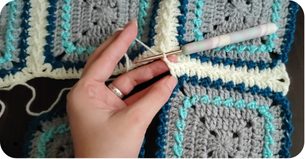
Joining as You Go
We will start from the bottom rigth corner adding squares to the left until complete the bottom row, then join the upper row from the left to the right, and so on until finish in the left upper corner of the blanket. Then, add the left and botton border to the whole blanket.

Step 1: * dc in the first sl st, 2 dc in the first dc from the previous round, (dc in the next 15 sts from the previous row, 2 dc in the next st, dc in the next sl st, ch2**
From * to ** represent one solid black line in the graph above.
Step 2: repeat from * to ** 2 more times.

Step 3: dc in the first sl st from the next square to join, 2 dc in the next stitch, pull the loop off from the hook, insert the hook in the third stitch from the corner of the previous granny square and pull the loop through the stitch.

Step 4: * dc in the next 3 stitches from the square you are joining and pull the loop through the stitch. **
Repeat from * to ** 5 times.

Step 5: 2 dc in the next stitch, dc in the next sl st from the corner, ch 1, pull the loop through the ch 2 space of the previous square, ch 1.
From step 3 to 5 represent the dotted line in the graph above.

Step 6: keep joining more squares until you reach the second side of your last square of the row.

Step 7: dc in the next sl st, ch 2.
Step 8: dc in the first sl st from the next square to join, 2 dc in the next stitch, pull the loop off from the hook, insert the hook in the third stitch from the corner of the previous granny square and pull the loop through the stitch.
* dc in the next 3 stitches from the square you are joining and pull the loop through the stitch. **
Repeat from * to ** 5 times, 2 dc in the next stitch, dc in the next sl st from the corner, ch 1.
Step 9: pull the loop through the ch space of the adjacent square from the previous row, ch 1, * pull the loop through the ch space of the next square from the previous row. **


Step 10: Repeat from step 1 to 9 in the same except for step 3 until you complete joining all the rows.
Step 3 from second row: dc in the next sl st, ch 1, pull the loop through the ch space between the granny squares from the previous join, ch 1.


Step 12: * dc in the first sl st, 2 dc in the first dc from the previous round, (dc in the next 15 sts from the previous row, 2 dc in the next st, dc in the next sl st of the corner, ch 1, pull the loop through the ch space between the granny square, ch 1**
Repeat from * to ** for each square. This represent one solid red line in the graph above.


Border Instructions
Using the cream color
Row 1: ch 1 (does not count as stitch), * 2 sc in the same ch space, ^sc into each stitch from last round of the granny squares, hdc into next ch space, hdc in the joining stitch between granny squares, hdc in the next ch space^^
Repeat from ^ to ^^ until you reach the corner of the blanket, 2 sc in the corner, ch 2, 2 sc in the same corner. **

Repeat from * to ** for each side of the blanket, join with slip stitch in the first sc. Cut the yarn.
Change to the main color yarn in any ch 2 corner.
Row 2 - 3: ch 1 (does not count as stitch), * 2 dc in the same corner, dc into each stitch from last round, 2 dc in the next corner, ch 2.**
Repeat from * to ** for each side of the blanket.
Change the yarn to the cream/joining color, work in the wrong side of the blanket.
Row 4: ch 1 (does not count as stitch), * sl st in the same corner, dc in the same corner, ^ sl st in the next stitch, dc in the next stitch ^^, repeat from ^ to ^^ until you have 1 stitch left before the corner, sl st in the next stitch, dc in the next corner **
Repeat from * to ** for each side of the blanket, sl st to join with the first st of the round.
Take the main color again, turn your work to the right side.
Row 5: ch 1 (does not count as stitch), hdc into each stitch from last round, work 2 hdc, ch 2, 2 hdc in the center stitch of the corners of the blanket (slip stitch in the corner). Slip stitch in the first hdc to join.
Turn your work to the wrong side.
Row 6: ch 1 (does not count as stitch), hdc into each stitch from last round, work 2 hdc, ch 2, 2 hdc in corners (ch 2 space). Slip stitch in the first hdc to join.
Fasten off and cut the yarn. Weave in all your ends.
Finishing Touches
Once the border is complete, weave in all loose ends and block your blanket for the best drape and stitch definition.
And your Little Waves Granny Square Blanket is complete — whether you’ve used solid colors or played with variegated yarns and leftover bits like I did in my second version, you’ll always have a beautiful creation to treasure. Each square carries a rhythm of calm and care, making this blanket a cozy, handmade hug. I hope you enjoyed the journey, and that your finished piece brings comfort, joy, and a touch of gentle waves to whoever wraps themselves in it.
You can find the PDF pattern of this design in my Ravelry, Etsy and Lovecrafts shop, it includes the instructions to make the matching bonnet!
Share Your Work!
If you make the Little Waves Granny Square Blanket, I’d love to see your creations! Tag me on Instagram @gavacrochet and use the hashtag #LittleWavesBlanket to share your version.
This pattern is perfect for anyone who enjoys the rhythmic, meditative joy of crocheting granny squares while creating something beautiful and practical. Happy crocheting! 😊
